Angular Google Social Login and AuthGuard
In this article, we are going to be exploring social login, which is a way for a user to login to a web app using social apps such as google, twitter, GitHub and Facebook.
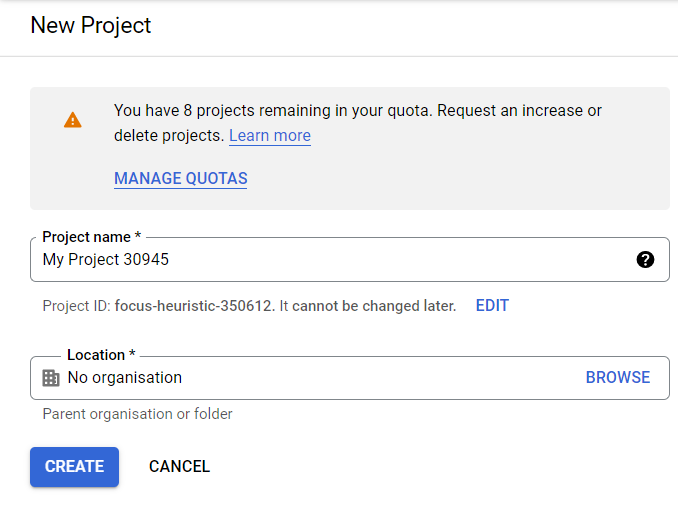
We will be implementing social login with google, so open google developer console and select new project, fill in the project name and select no organization and click the create button.
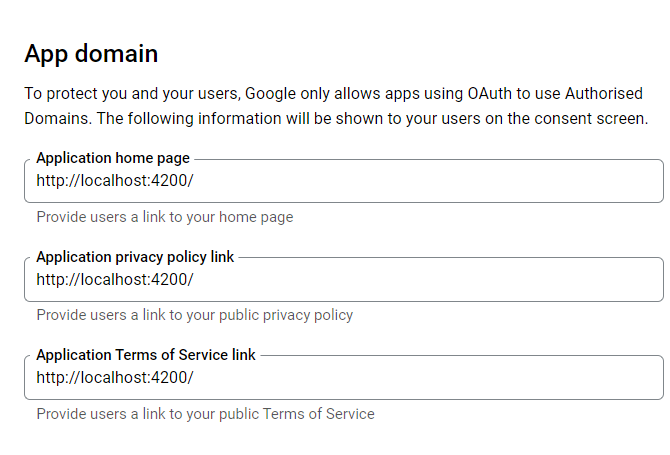
After your project has been created, you’ll see an option to select it. On your sidebar, navigate to API and Services, then OAuth consent screen, which enables your web app to request authorizations from a google account. You’ll see two options select external and continue to setup your app. On your app domain enter the following:
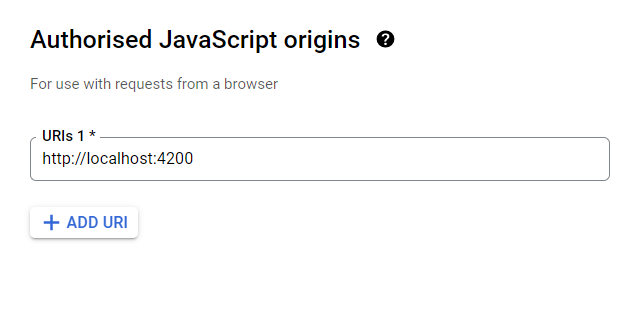
After you finished updating, click on save and continue, next we are going to setup credentials so we can get the ClientID. So click on credentials, add credentials and select OAuth clientID. Select application type as web application, and write the app name. In the authorized JavaScript origins enter http://localhost:4200 and click create.
The 0Auth client will be created and a pop up with the client ID and client secret will appear.
We have finished setting up, now we need to install the angular social login package using the following command:
npm install angularx-social-login
I’m going to be running that command in a new angular app, because that is where I’d like to implement the social login feature. Import Social Login Module, SocialAuthServiceConfig and GoogleLoginProvider in the app.module.ts file.
So the updated app.module.ts file looks like this:
import { NgModule } from '@angular/core';import { BrowserModule } from '@angular/platform-browser';import { AppRoutingModule } from './app-routing.module';import { AppComponent } from './app.component';import {SocialLoginModule,SocialAuthServiceConfig,GoogleLoginProvider,} from 'angularx-social-login';@NgModule({declarations: [AppComponent],imports: [BrowserModule,AppRoutingModule,SocialLoginModule,GoogleLoginProvider,],providers: [{provide: 'SocialAuthServiceConfig',useValue: {autoLogin: false,providers: [{id: GoogleLoginProvider.PROVIDER_ID,provider: new GoogleLoginProvider('clientId'),},],onError: (err) => {console.error(err);},} as SocialAuthServiceConfig,},],bootstrap: [AppComponent],})export class AppModule {}
On firebase you should go to authentication and select google as your sign in method for us to be able to sign in with google. Under authorized domains localhost should be one of them.
Let us go ahead and create two components, a signin component and a landing page component we will call home.
ng g c signin
And for the landing page:
ng g c home
The home page is not going to have much, just a message that we have successfully logged in. So we can go ahead and edit the home.component.html to be as follows:
<p>You have Successfully logged in!!</p>
The SignIn component is also going to be simple, only containing a button called login with google, so let us go ahead and edit the signin.component.html file to be as follows:
<div class="formGroup"><buttonmat-raised-buttoncolor="primary"type="button"><i class="fa fa-google" aria-hidden="true" style="margin-right: 10px"></i>Login With Google</button></div>
And I wanted the button to be centered in the middle of the page. However, you can place the button where you want to. So I edited the signin.component.css file to be as follows:
.formGroup {justify-content: center;align-items: center;margin: auto;text-align: center;display: flex;height: 100%;position: relative;}button {justify-content: center;align-items: center;margin: auto;position: relative;}
So currently we have not functionality to enable the authentication process, so let us create a service and call it auth.
ng g s auth
Under the auth.service.ts file we need to add the following to enable sign in from google using firebase.
import { Injectable } from '@angular/core';import { GoogleAuthProvider } from 'firebase/auth';import { AngularFireAuth } from '@angular/fire/compat/auth';import firebase from 'firebase/compat';import { Router } from '@angular/router';@Injectable({providedIn: 'root',})export class AuthService {constructor(public fireAuth: AngularFireAuth, private router: Router) {}GoogleAuth() {return this.AuthLogin(new GoogleAuthProvider());}AuthLogin(provider: firebase.auth.AuthProvider) {return this.fireAuth.signInWithPopup(provider).then((result) => {alert('You have successfully logged in');this.router.navigateByUrl('/home');}).catch((error) => {console.log(error);});}}
So with this we need to make changes to our sign in component to include the auth file. So let us start with signin.component.ts file by adding an import from auth service.
import { Component, OnInit } from '@angular/core';import { AuthService } from '../services/auth.service';@Component({selector: 'app-signin',templateUrl: './signin.component.html',styleUrls: ['./signin.component.css'],})export class SigninComponent implements OnInit {constructor(public authService: AuthService) {}ngOnInit(): void {}}
In our signin.component.html we need to add a click event, so when the button is clicked the auth service is called and thus enabling us to sign in with google. So the updated file looks as follows:
<div class="formGroup"><buttonmat-raised-buttoncolor="primary"type="button"(click)="authService.GoogleAuth()"><i class="fa fa-google" aria-hidden="true" style="margin-right: 10px"></i>Login With Google</button></div>
So now when you click the button you should get a pop up to select which account to login to the app with, after you select an account you should be able to be redirected to the home page that displays a message. For you to check that you are actually logged in go to firebase console, click on authentication under users tab you should be able to see who is logged in to your app.
That is it for this week, Happy Coding!
Thank you for reading ........!


