

Supabase is a cloud-based platform that provides a suite of tools for building modern web applications. One of the benefits of using Supabase is that it's built on top of PostgreSQL, which is a powerful and widely-used relational database system.
If you're building a Node.js application and want to integrate Supabase as your backend, there are a few steps you need to take.
- Set up a Supabase project
To get started with Supabase, you'll need to create an account on their website and create a new project. Once you've done that, you'll need to retrieve your project's URL and API key, which you'll use to authenticate requests to Supabase.
- Install the Supabase client
Next, you'll need to install the Supabase client for Node.js. You can do this using npm:
bashCopy codenpm install @supabase/supabase-js
This will install the Supabase client library, which you'll use to interact with your Supabase project from your Node.js application.
- Initialize the client
To use the Supabase client, you'll need to initialize it with your project URL and API key. You can do this using the following code:
javascriptCopy codeconst { createClient } = require('@supabase/supabase-js')
const supabaseUrl = 'https://yourprojecturl.supabase.co'
const supabaseKey = 'yourapikey'
const supabase = createClient(supabaseUrl, supabaseKey)
Replace 'yourprojecturl' and 'yourapikey' with your actual Supabase project URL and API key.
- Use the client
Once you've initialized the client, you can use it to interact with your Supabase project. For example, you can query your database using the supabase.from method:
csharpCopy codeconst { data, error } = await supabase.from('mytable').select('*')
This code will retrieve all rows from the mytable table in your Supabase project.
You can also use the client to insert new data into your database:
phpCopy codeconst { data, error } = await supabase.from('mytable').insert([{ name: 'John', age: 30 }])
This code will insert a new row into the mytable table with the name 'John' and age 30.
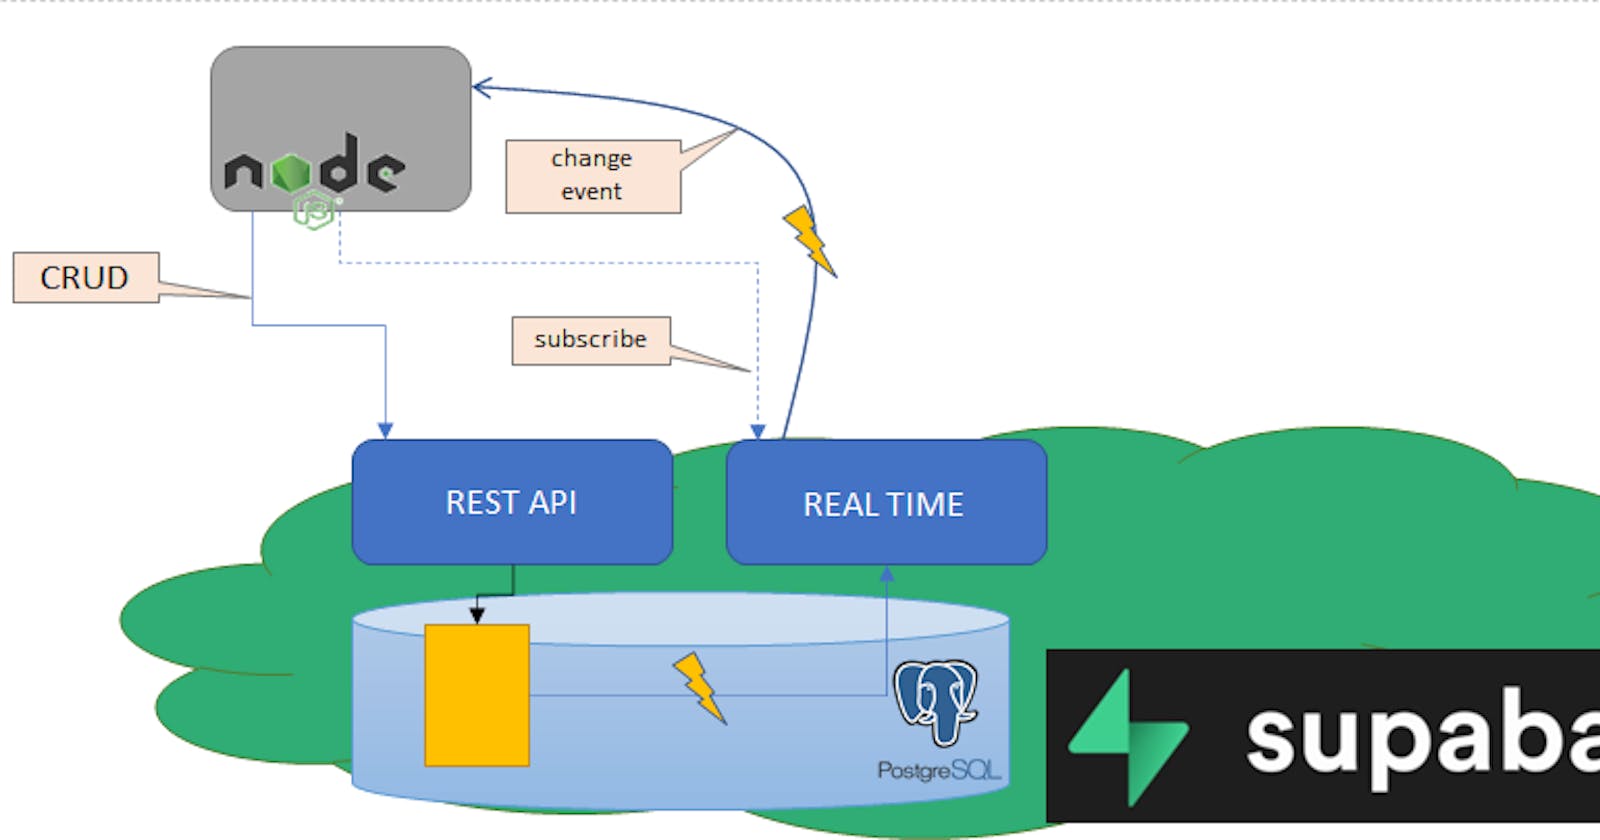
There are many other methods you can use with the Supabase client, including updating and deleting data, subscribing to real-time changes, and more. You can find more information in the Supabase documentation.
- Use Supabase in your Node.js application
Now that you've set up your Supabase project and initialized the client, you can start using Supabase in your Node.js application.
Below Example code is supabase with node js complete CRUD.
//supabase crud using node js


const { createClient } = require('@supabase/supabase-js');


const supabaseUrl = 'https://<ProjectURl>.supabase.co'

const supabaseKey = `Public anon key`

const supabase = createClient(supabaseUrl, supabaseKey)


// getData start here

async function getData() {
    try {
        const { data, error } = await supabase
            .from('profile')
            .select('*')
        // .eq('id', true)

        if (error) throw error
        console.log(data)
    } catch (error) {
        console.error(error)
    }
}

getData()

// getData end here

// insert data start here

async function createData() {

    try {
        const { data, error } = await supabase
            .from('profile')
            .insert([
                { name: 'John Doe' },
                { name: 'Jane Smith' },
            ])
        if (error) throw error
        console.log(data)
    } catch (error) {
        console.error(error)
    }

}
createData()
// insert data end here

// update data start here
async function updateData() {
    try {
        const { data, error } = await supabase
            .from('profile')
            .update({ name: ' Doe' })
            .eq('id', 1)
        if (error) throw error
        console.log(data)
    } catch (error) {
        console.error(error)
    }
}
updateData()

//   update data end here

// delete data start here
async function deleteData() {
    try {
        const { data, error } = await supabase
            .from('profile')
            .delete()
            .eq('id', 1)

        if (error) throw error
        console.log(data)
    } catch (error) {
        console.error(error)
    }
}

deleteData()

// delete data end here
That's all!